Archive for November, 2014
Adventures in Cooking: I Made Risotto!
 At our recent Slimming World taster evening, one of the ladies made the risotto out of the August Slimming World magazine. It was delicious, and it was the first time I had ever had risotto. I just don’t like rice a whole lot so I don’t eat it often and I rarely make it. Even when we have a Chinese or Indian takeaway, it’s a struggle to eat the rice (even though it’s a fabulous free food!). When I got home, I mentioned this recipe to Tim and he asked if I would try it……ah, the things we do for love.
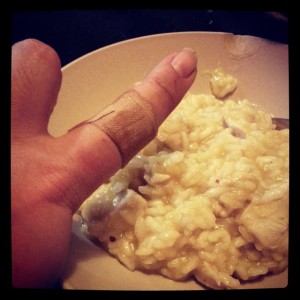
The original recipe was called (I think) Butternut Squash Risotto. Naturally, it called for a butternut squash. Which I didn’t have. But I did have something called an “onion squash” (called that, I’m guessing because it looked like a giant orange onion) I bought at Waitrose a few weeks ago, so I decided to use that. Cutting into it was tough…so tough my big knife slipped and took a slice out of my knuckle. Ow. Disaster #1. I decided to pull out some pumpkin puree from the freezer instead. I also decided to add some chicken to the recipe, as that’s how we had it at group and it was really good. The recipe also called for onion and garlic (which I omit always due to allergies) and a red chili…which I didn’t have, but I had some dried red chili flakes, so those would have to do.
After cooking the chicken and the veg, the next step is adding the risotto rice and BOILING HOT STOCK one ladleful at a time. The dish has to be kept constantly stirred and the idea is you add a ladle of stock, stir, let it absorb, and repeat until you have one last ladleful of stock to put in. So, ladle in one hand and wooden spoon in the other I began. After 2-3 ladlefuls, my wooden spoon slipped and >SPLAT< a spoonful of boiling hot stock and rice landed on my hand. Ow. I dropped the spoon into the dish and ran my hand under cold water. Disaster #2. I carried on, though I only used 700ml of stock when the recipe called for a full Litre. I can only assume this is because I used pureed pumpkin instead of chunks of squash. Since it looked awfully goey, I took it off the heat, didn't bother adding the last of the stock and stuck a lid on it for 3 minutes.
As I was dishing it out I discovered that when I stopped stirring it to tend to my burnt hand it caused some of the rice to stick to the bottom of my cast iron dutch oven. Disaster #3.
But the risotto was yummy, and Tim even went back for seconds!
I decided the best way to try to clean this would be to add some water to the pot, squirt in some Fairy Platinum, and boil it for 20 minutes to hopefully loosen the stuck on rice. After 20 minutes I took the pot off the heat, grabbed a scrubber and started scraping....and splashed my other hand with boiling hot water. Disaster #4. Fortunately, I was able to shift all the cooked on rice and have rescued my pot. Would I make this again? Sure! But I think I'll be more careful....maybe wear some gloves.
Would you like the recipe?
You will need:
Diced chicken breast (I used one, but you could buy a pack of pre-diced)
250g pumpkin puree
275g risotto rice
700ml boiling hot vegetable stock
Pinch of red pepper flakes
Fry light
Salt & pepper
heavy pot with lid
1. Spray the bottom of a heavy pot with fry light and add the chicken and cook until the chicken is browned on all sides.
2. Add pumpkin puree and the pinch of red pepper flakes.
3. Add risotto rice and simmer for 2-3 minutes.
4. Add a ladle of stock, and cook for 2 minutes (or until stock is absorbed), stirring constantly.
5. continue to add stock in two minute intervals and continually stir.
6. About 15 minutes later, you should be on the last ladleful. Remove pot from heat, stir in the last ladle of stock, season with salt and pepper, and cover for 3 minutes.
Enjoy!
(and if you're on Slimming World, this Risotto is free on EE!)
***
Please note: Syn values are based on my exact ingredients using the online calculator. Your Syn value may vary based on your ingredients and the size of your baking containers and portions, so use this number as a guide only. Syn values also frequently change, but these values are correct at the time of publication.
The contents of this post, including images are © Rebecca J Lockley and Tim Lockley unless otherwise stated and should not be reproduced without permission. If you are not reading this on http://blog.beccajanestclair.com, my facebook page, Networked Blogs, the RSS feed(s), or through an e-mail subscription, please notify me.
DISCLAIMER: I do not work for Slimming World, I am not affiliated with Slimming World beyond being a paying customer/member, I get no personal benefit from writing this post other than the joy of sharing.
[LJ readers reading this on the LJ RSS feed: Please click on the link at the top of the entry to go directly to my blog to leave a comment, as comments left on the LJ RSS do not get seen by me. Facebook users reading this from my Networked Blogs link can either comment on facebook or on my blog. If you are reading this through an e-mail subscription, you might need to go directly to my blog to view videos and images.]
For full Copyright and Disclaimer, please read http://www.blog.beccajanestclair.com/copyright/
No commentsMy Visa Journey Part 3: Citizenship
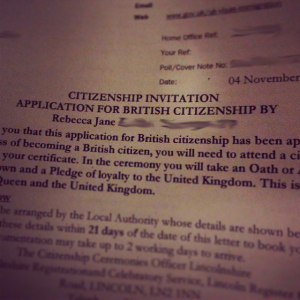
 I became eligible for my UK citizenship in January 2013 after three years of residency, but we did not submit my application until September 2014. At the time I submitted my application, I was quoted as it taking 3-6 months to process, but closer to six….so imagine my surprise on Saturday when I got my acceptance letter! Total time from application being submitted to letter arriving on my doorstep was 6 weeks and 6 days!
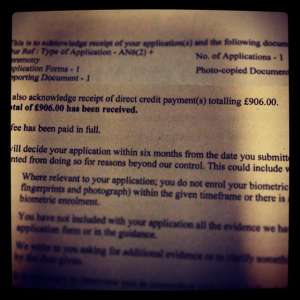
The application itself is pretty straight forward. You download it off the gov.uk website. Don’t forget to download the guide and booklet to filling out the application as well as the payment form*! The current fee is £906, but this usually increases every 6-12 months, so it’s a good idea for you to double check with the website. I think the most frustrating part for me was finding the application online as UKBA used to have it’s own separate website and sometime between getting my ILR in 2012 and now, they moved all their files over to gov.uk. Google to the rescue!
You can either send your application in on your own (and send all your original documents) or you can pay £50 to your local council for a Nationality Checking Service. At this appointment, they will photocopy all of your documents and send those so you will not need to send in your originals.
Before you start to fill out the application, you need to get your photograph taken. I went to Snappy Snaps and had 4 photos done for £10. I’ve since used one for my provisional driver’s license and will use the remaining two when I apply for my British passport. You also could use one of those £5 machines in Tesco, Asda, etc. but every time we tried to get mine done the machine seemed to be down. I also preferred having mine done by a person and not a machine, because this ensured my photograph met the exact standards. Photos in hand, I was ready for the second important part of my application: your references.
You need to have two references. Both references need to have known you for at least three years. One needs to fit some very specific criteria** such as being a business owner, and the other reference needs to hold a valid British passport. Your first reference does not necessarily need to be British, by the way and neither referee can be related to you, even by marriage. Fortunately for me, I have been friends with the owner of MediVisas (BTW, an excellent source of advice!) for well over three years and I used one of our local 16mm members who I have known since I was first a visitor in 2008.

Before you sit down to fill out your application, you should first make sure you fit the residency criteria. As the spouse of a British citizen, I was eligible after three years of residency. Even though I waited longer, they are only interested in the past three years. You must have been in the country (not travelling) on the date exactly three years before the date of your application, and in the past three years you must not have been out of the UK for more than a total of 270 days and no more than 90 in the past 12 months. You also will need to know the exact dates you were out of the country (if you didn’t keep track, just go back through your passport stamps). Days spent partially in the UK (date you left and date you returned) do not count. You will need to enter the dates (for the past three years only if applying as a spouse) on page 7. If you run out of space, you can add additional details on page 13.
In addition to needing to know when you were out of the country, you need to list all of your UK addresses for the past 5 (three as a spouse) years. This can prove difficult for people who have moved multiple times. If you are reading this now with an eye to gaining citizenship, start keeping track of your addresses!
If you didn’t need to take the Life in the UK test for your ILR, you will need to take this test before you can apply for citizenship. If you are not from an English speaking country, you also will need to take an English language tests. Details for both of these can be found on the website. Hopefully, you kept hold of your LitUK test result paper, because you will need to send it with your application. If you don’t have it, you will need to take the test again, as they do not re-issue pass certificates.
You also will need to know your parents full names (including maiden for mother), birth date, nationality, and birth place, as well as all of this information for your spouse.
If you book a Nationality Checking Service appointment, you will need to bring:
-Your current passport and your passport with your current visa (if it’s in an expired passport)
-Your expired passport if it shows dates you were out of the country in the past 3 years***
-Your birth certificate
-Spouse’s current passport
-Spouse’s birth certificate
-Marriage certificate (the certified one, not the pretty one)
-Life in the UK Test pass certificate
-English language test results (if applicable)
-Proof of current address+
-Any other documents showing a change in identity (examples: adoption certificates for you or your spouse, divorce papers if either of you were previously married)
-Any other travel documents as issued by the Home Office. If you have a biometric card, bring it (I don’t have one).
-£50 to pay for the Nationality Checking Service (My council only accepted cash)
-Completed Application
-Payment slip for citizenship plus payment (No cash accepted. Card or Cheque only)
Please note that if any of your documents are in a language other than English, you will need to get them translated.
My Nationality Checking Service appointment was on a Wednesday morning. I did not need to bring my spouse along with me, but I did need to bring his documents. My appointment took about 15 minutes because I had organized everything ahead of time in a document folio in the exact order it would be needed. The woman who did my review praised my organisation….I couldn’t imagine doing these things without keeping my paperwork organised! As we went through my application, she had a checklist of documents and after we made the stack, she left the room to photocopy everything and returned all of my original documents to me. If you do not use the checking service, you cannot send copies and would need to send your originals.

At the appointment, I was told I would hear from them in about 2 weeks letting me know the payment had been taken, and then I wouldn’t hear again for 6 months as that was how long it was taking to process applications. Well, I must be lucky as my letter arrived this weekend — what a perfect fifth anniversary present for us!
First thing Monday morning (today!) is ringing up the county council office to schedule my citizenship ceremony! Unfortunately, I can’t apply for my British passport right away as I am travelling to the US in January and I do not think I would have my passport back in time, but at least I will have my new passport before my trip to the US in May! (and yes, I will keep my blue US one too! I get to be a dual citizen!)
***
*When I went to my appointment, they had copies of the payment form, but to be on the safe side I would print one out.
**The guide claims there is a “list on our website”, but I could never find it. However, the full list if acceptable referees can be found here.
***If you have travelled to a country that is part of the CTA (such as Ireland) it’s a good idea if you have copies of your boarding cards if you flew or took a ferry to show the dates you entered and left. I’m not sure if this was a requirement, but I submitted the information as I listed Ireland on my dates out of the UK.
+This is not listed as a requirement, however I was asked for this at my appointment. Fortunately, I had with me the letter I recieved with my ILR that listed my current address, although she did tell me it would have been okay if I didn’t.
The contents of this post, including images are © Rebecca J Lockley and Tim Lockley unless otherwise stated and should not be reproduced without permission. If you are not reading this on http://blog.beccajanestclair.com, my facebook page, Networked Blogs, the RSS feed(s), or through an e-mail subscription, please notify me.
[LJ readers reading this on the LJ RSS feed: Please click on the link at the top of the entry to go directly to my blog to leave a comment, as comments left on the LJ RSS do not get seen by me. Facebook users reading this from my Networked Blogs link can either comment on facebook or on my blog. If you are reading this through an e-mail subscription, you might need to go directly to my blog to view videos and images.]
For full Copyright and Disclaimer, please read http://www.blog.beccajanestclair.com/copyright/
No comments[Recipe] Pumpkin Pie Tarts [Slimming World Friendly]
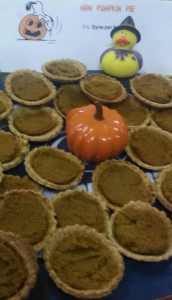
 My Slimming World group had a taster evening right before Halloween and I decided to bring an American-style treat. I knew I wanted to make something with pumpkin, since it’s the season for pumpkin everything in the US, and so I came up with these tarts based on my mince pie tarts from Christmas. Because pumpkin is a vegetable, it’s free no matter what you do to it so you only need to syn the pastry, in this case two of these little tarts come in at 1.5 Syns. The filling and pastry are egg-free, and I’m sure you could substitute in gluten free flour (but please recalculate your syns!) to make a gluten free treat.
[DISCLAIMER: I do not work for Slimming World, I am not affiliated with Slimming World beyond being a paying customer/member, I get no personal benefit from writing this post other than the joy of sharing.]
This will make 38 tarts. If you follow this recipe exactly, your Syn value is .75 per tart, or two tarts for 1.5 Syns.
[Please note: Syn values are based on my exact ingredients using the online calculator. Your Syn value may vary based on your ingredients and the size of your baking containers and portions, so use this number as a guide only. Syn values also frequently change, but these values are correct at the time of publication.]
You will need:
For the pastry:
225g wholemeal flour (I used Alinson’s)
100g Flora light (blue container)
pinch of salt
water
(if you prefer a sweeter base, add some sugar substitute)
For the filling:
400-500g pureed pumpkin (you also can use tinned pumpkin)
1/4C sugar substitute (I used Truvia)
1/8 tsp nutmeg
1/8 tsp ginger
1/4 tsp cinnamon
1/4 tsp mixed spice
tart pans
biscuit cutter
fry light
1. Combine flour and salt and rub Flora until crumbs are formed.
2. Add a little water until dough sticks together and form into a ball.
3. Refrigerate pastry for 30 minutes.
4. While the pastry chills, combine all filling ingredients and set aside and pre-heat the oven to 180C.
5. Roll out your pastry as thinly as possible and use the middle-sided biscuit cutter to cut out 38 rounds.
6. Spray a tart pan and gently press the rounds of pastry into the cups, shaping it up the sides. Fill with approximately 1TBS pumpkin filling. (I eyeballed it)
7. Bake for 20 minutes or until tart bases are firm and slightly browning. Filling will not be solid.
8. Turn out onto a cooling rack for about 10 minutes before serving.
Enjoy!
I can’t wait to make these for Ex-pat Thanksgiving!
***
The contents of this post, including images are © Rebecca J Lockley and Tim Lockley unless otherwise stated and should not be reproduced without permission. If you are not reading this on http://blog.beccajanestclair.com, my facebook page, Networked Blogs, the RSS feed(s), or through an e-mail subscription, please notify me.
[LJ readers reading this on the LJ RSS feed: Please click on the link at the top of the entry to go directly to my blog to leave a comment, as comments left on the LJ RSS do not get seen by me. Facebook users reading this from my Networked Blogs link can either comment on facebook or on my blog. If you are reading this through an e-mail subscription, you might need to go directly to my blog to view videos and images.]
For full Copyright and Disclaimer, please read http://www.blog.beccajanestclair.com/copyright/
No comments

