Archive for the 'Arts and Crafts' Category
Foot Therapy: DIY Foot Soak
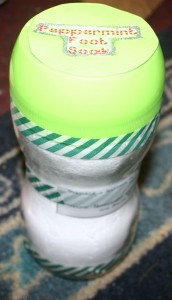
I needed a gift idea for my Mother-in-law. She’s hard to shop for because she will always tell us she doesn’t want anything! I decided to make her some peppermint foot soak. I would make some for my mom, too, but I don’t think a bag full of white powder would make it though customs, do you?
It’s really easy to make, too! I ordered all my supplies off eBay, and I have more than enough for several more batches. Buying the baking soda/bicarbonate of soda in bulk online will save you a bundle. I think I spent around £10 for the supplies, but that included essential oils for other projects, too.
You will need:
1 Cup Epsom Salts
1 Cup Baking Soda or Bicarbonate
Essentail Oil (I used peppermint and eucalyptus, but you can use whatever you want)
Mix together the Salt and Soda and add however many drops of oil you’d like (I probably used about a dozen of each). Stir or shake t distribute the oil. If you can’t smell the oil, add a few more drops.
Store in a clean jar. For gift giving, you could make a label for the jar and some instructions (sprinkle in a footbath or tub). I also included a list of ingredients so the receiver would know if they were intolerant of any of the items. I used a jar that some Stevia came in because I liked the shape of the jar and the colour of the lid.
The Eucalyptus is also great if you’ve got a cold. I just added a few drops to my bath and it helped to clear my nose!
~~*~~
The contents of this post, including images are © Rebecca J Lockley and Tim Lockley unless otherwise stated and should not be reproduced without permission. If you are not reading this on http://blog.beccajanestclair.com, my facebook page, Networked Blogs, the RSS feed(s), or through an e-mail subscription, please notify me.
[LJ readers reading this on the LJ RSS feed: Please click on the link at the top of the entry to go directly to my blog to leave a comment, as comments left on the LJ RSS do not get seen by me. Facebook users reading this from my Networked Blogs link can either comment on facebook or on my blog. If you are reading this through an e-mail subscription, you might need to go directly to my blog to view videos and images.]
For full Copyright and Disclaimer, please read http://www.blog.beccajanestclair.com/copyright/
No commentsMollie Makes: Dingly Dangly Flower (Issue 2)

[picture from Mollie Makes]
In late Spring 2011, I discovered my first issue of Mollie Makes magazine. Unfortunately, it was issue 2, and I never managed to track down issue 1.
Mollie Makes was a new craft magazine and it drew me in because it looked like it was all of my favourite blogs and projects I looked at on US blogs/websites being made in the UK. I was so excited to finally find a magazine I could identify with after being disappointed with scrapbooking/card making magazines on offer here. I tore out the insert and took it into the Spar shop and asked if they could please add the magazine to our order (Tim gets loads of railway and garden railway magazines and I already received Jamie magazine). It took him a few months and a few trips running around Lincoln trying to find copies, but I finally now regularly pick up my issue at the corner shop each month.
Every month, Mollie Makes comes with something attached to the magazine. Usually a kit, but it’s also been ribbon and in January it was a calendar. I always devour the magazine and look at all the amazing projects…and never do them. I wind up putting the magazine in my magazine file “to do later”.
Last night, I pulled out the first issue of Mollie Makes I have. Attached to the front was a cute little felt flower kit – the kit that first drew my attention when I saw the magazine on display in WH Smith. Directions for the flower can be found inside the issue, including the pattern at half-size. In order to make the flower, you need to enlarge the pattern by 200%. Now, this can be tricky for people who don’t know how to us a copy machine, so Mollie Makes kindly puts all their patterns on their website, one pdf file per issue.
I printed the flower pattern out on regular paper, but soon wished I had used vellum or tracing paper as the printer paper was too stiff for pinning to the felt and I wound up with some misshapen petals as a result. The magazine also didn’t give much in the way of sewing instructions, so I had to make things up as I went along. The flower stayed together, so that’s all that matters.
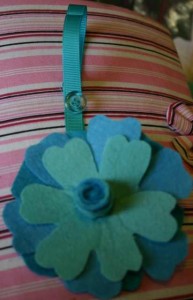
See? Not bad.
~~*~~
The contents of this post, including images are © Rebecca J Lockley and Tim Lockley unless otherwise stated and should not be reproduced without permission. If you are not reading this on http://blog.beccajanestclair.com, my facebook page, the RSS feed(s), or through an e-mail subscription, please notify me.
[LJ readers reading this on the LJ RSS feed: Please click on the link at the top of the entry to go directly to my blog to leave a comment, as comments left on the LJ RSS do not get seen by me. Facebook users reading this from my Networked Blogs link can either comment on facebook or on my blog.]
4 commentsMake Your Own Draft Stopper
A few weeks back I talked about things we were doing to get our home ready for Winter and I mentioned making draft stoppers for the front door and living room door. Today I decided to make the front door draft blocker.

[It will be on the inside of the door, but there was better lighting if I took the photo outside!]
You will need:
-A pair of thick tights (40 denier or higher. Used is Ok, but make sure it doesn’t have any holes)
-Sand (I used about 6KG of builder’s sand, but you could get sand from a beach or a sandbox too. We just happen to have builder’s sand in the shed)
-Cardboard or a funnel
-Scissors
-Rubber gloves (optional, but it keeps the sand from getting stuck under your fingernails)
Step One:
Cut down the center of the tights to separate the legs.
Step Two:
Roll up the cardboard to create a funnel inside the leg, or use a funnel.
Step Three:
Fill up the leg with sand. This is best done outside! Once you think you have enough sand in the leg, stretch it out and move the sand around until it’s about the same length as the bottom of your door. Tie off the end and snip the edges. It should look something like this:
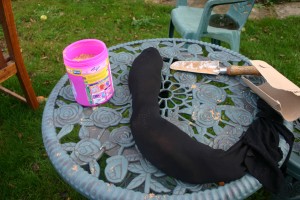
Step Four:
Take the other leg of the tights and stuff the sand-filled leg inside of it, leaving a small “tail” at the toe end. Tie off the outer tight at the top, cut the loose ends off, and tie a knot at the toe.

Your sand sock/draft buster is ready to use!
I’ve also been informed by my friend Lauren that if you use unscented kitty litter instead of sand it will absorb odours too. I did try this, and I have to say it wasn’t a success for me as it was too dusty and even though it says “unscented”, it still smelled like cat litter. I’m wondering if the clumping kind would have worked better, though.
~~*~~
The contents of this post, including images are © Rebecca J Lockley and Tim Lockley unless otherwise stated and should not be reproduced without permission. If you are not reading this on http://blog.beccajanestclair.com, my facebook page, or the RSS feed(s), please notify me.
[LJ readers reading this on the LJ RSS feed: Please click on the link at the top of the entry to go directly to my blog to leave a comment, as comments left on the LJ RSS do not get seen by me. Facebook users can comment directly on Facebook.]
4 commentsThe USS Intrepid….in Legos.
[Taking a brief break from posting about Austria]
A few weeks back, while I was in between bouts of flu (really. Who gets 2 different flu strains back-to-back? I DO!) Tim and I travelled down to Brighton to help out his friend Nick with his stand at ModelWorld, which is an annual model show. No, not fashion models! Things like trains, toys, ships, doll houses, aeroplanes, cars, trucks, and things made out of Lego.
There were loads of interesting things to see at Modelworld. I was quite smitten with a doll house display where they had put a T-gauge (think really small. The engine is less than 2 inches long) train track in the loft (US: attic) and had it running. There also was a Doctor Who display with loads of Dalek’s including the famous green Dalek from the Winston Churchill episode.
But what Tim and I liked the most, was the model of the USS Intrepid….made entirely out of Legos.
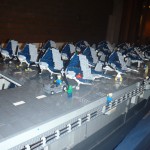
The Lego ship was 23 feet long, at a scale of 1:40…and I promise you, it looks exactly like the real thing.
Here is the real USS Intrepid:

[image thanks to WikiMedia]
And here’s the Lego version:

[image thanks to Lego Monster on Flickr]
Pretty impressive, right?
We got to speak with the man who built the Lego ship, and he told us that he has an invitation to take his Lego ship across the pond to put it on display on the actual USS Intrepid, which is currently serving as a Sea, Air and Space Museum.
What I loved about his ship was all the details – down to the planes having foldable wings!
[If you click on the photo once, it will take you to that photo’s page. If you click on the photo again, you will be able to view it full size. I have no idea why WordPress made it so complicated! Apologies to LiveJournal Users. If you do not see the gallery below, please visit my website via the link at the top of the entry to view the gallery. I am working on fixing that.]
[Photos taken by either myself or my husband, Tim and are all © Tim and Rebecca Lockley]
While at Modelworld, I snuck away for an afternoon and spent it with Tim’s cousins wandering Brighton. I’ll post about that and some of the other things we saw at Modelworld in a different post!
[LJ readers reading this on the LJ RSS feed: Please click on the link at the top of the entry to go directly to my blog to leave a comment, as comments left on the LJ RSS do not get seen by me. Facebook users can comment directly on Facebook.]
The contents of this post, including images are © Rebecca J Lockley and Tim Lockley unless otherwise stated and should not be reproduced without permission. If you are not reading this on http://blog.beccajanestclair.com, my facebook page, or the RSS feed(s), please notify me.
No commentsChristmas Cracker Tutorial
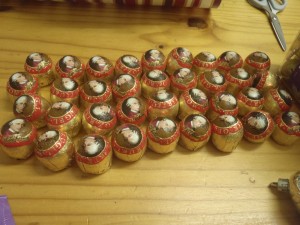
When Tim and I were in Austria, we bought several bags of Mozart Kugel that we wanted to share with our family. I hung onto them until Christmas, and I was planning on using leftover gauze bags from our wedding to put a few pieces in and tie them onto packages as decorations. I was browsing Craftster one day when I stumbled on this post about making your own crackers, and I thought that would be a really fun way of distributing the candy.
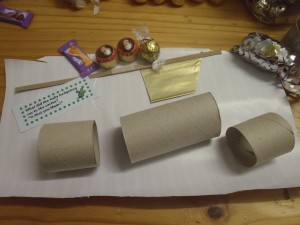
Authentic crackers go bang! when you pull on them, and some airlines even consider them explosive. I wanted mine to snap, and I wanted to include the traditional paper hat and silly joke (or “motto” as it gets called). So I hunted online. If you are in the US, you can get your supplies from a site called Old English Cracker. If you’re in the UK, you can do what I did and order your pieces off Amazon or go directly to the seller on Amazon, Fred Aldous. I spent about £7 for 24 snappers, 12 hats, and 48 “mottos” including shipping. Next year, I’ll only need to order snappers and hats!
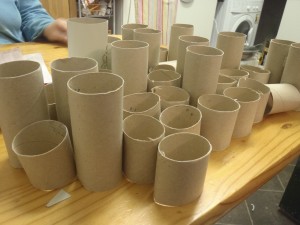
After you order your inside bits, and know what kind of “prize” you want (If I was in the US, I might look at Oriental Trading Co. for some inexpensive prizes), you need to start collecting your tubes. For each cracker, you will need either 1 empty kitchen roll (US: paper towel) tube or 2 empty toilet paper tubes. Depending on the size of your household and how quickly you use those products, you might have to start collecting early! You will use one tube as the middle, and cut the other tube in half to be the sides. If you are using a kitchen roll tube, cut it in half, and then cut one side in half again. If you are using a combination of TP tubes and kitchen roll tubes, check to make sure they are the same width. If not, make sure you use all 3 pieces of kitchen roll tube on the same cracker.
Other supplies include: curling ribbon, tape, and wrapping paper.
You’ll need a piece of wrapping paper that easily wraps around the three tubes plus leave some extra on either end. Our pieces were just big enough, so when I make them next year, I’m going to add a little extra to the sides.
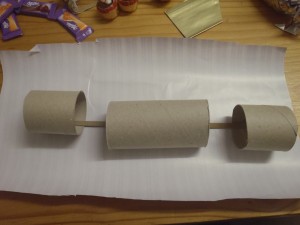
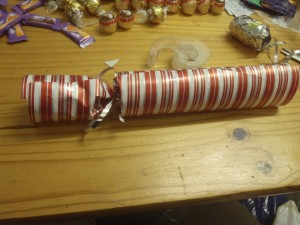
Lay your wrapping paper print side down, with the large tube in the middle and a small tube on either side. Take your snapper and put it inside the tubes, making sure it’s not sticking out on either end, and secure it with tape to the inside of each small tube. The one pictured has the snapper taped down flat, but I also taped some in diagonally, and those seemed to snap better. At this point, put the hat and motto in the middle section (it’s a lot easier at this stage).
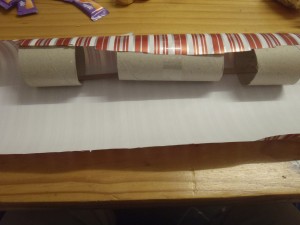
Next, roll the wrapping paper around the tube, securing with tape on the middle piece. You shouldn’t need tape on the side pieces, and I think it works a lot easier to leave those tape free for now.
This next step might take some practise. Cut a length of the curling ribbon and pinch together the wrapping paper between one small roll and the middle roll, being careful not to tear the paper. Wrap the ribbon around the pinched area and tie it as tight as you can (again, without ripping. Told you, it might take some practise)
Now pick up the cracker, with the pinched side down and insert your candy/prize through the other end. If it falls out the other side, you didn’t tie the ribbon tight enough. Repeat pinching and tying on the other side of your cracker.
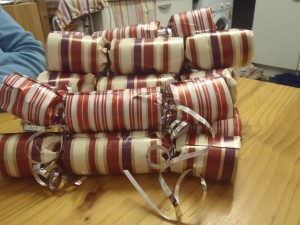
The very last step is tucking the stray wrapping paper around the ends (if there is any) and curling the ribbon ties. At this point, you might also want to straighten the wrapping paper around the sides and tape it down.
The whole family loved them, and my SIL told me they looked like professional store-bought crackers! Can’t wait to make them next year!
[LJ readers reading this on the LJ RSS feed: Please click on the link at the top of the entry to go directly to my blog to leave a comment, as comments left on the LJ RSS do not get seen by me. Facebook users can comment directly on Facebook.]
1 commentCrafting in the Wee Hours of Morning
Tim’s on the overnight shift all week, and I somehow managed to put myself on the same sleep cycle as him so I’m awake at home overnight until he gets home at 6am and then we both go to bed until around 1 or 2 in the afternoon.
Tonight after dinner we finished off the last of the ice cream, and since the container was plastic, I set it in the sink to rinse out before putting it out for recycling. Well…it never made it to the recycling bin. I decided I wanted to have arts and crafts time at 1:30 in the morning!
We bought a blanket for £2 at Primark to keep on the sette (US: sofa/couch) because it sometimes gets chilly down here without the fireplace going and it came wrapped in a black ribbon. I saved the ribbon, figuring it could find it’s way onto a Christmas present as a ribbon or something. We also had a huge roll of silver wrapping paper Tim bought, and I had some star-shaped gift tags I had picked up for £1. Also on hand was some glitter glue (leftover from making Tim’s Christmas stocking) and a glue stick.
I laid the ice cream container on it’s side and traced a line onto the wrapping paper to mark the bottom, then cut it out. I used the glue stick to glue the paper all around the side of the carton. I wound up splitting the paper into half, because it was hard getting the long strip around the curves. Then, I laid the lid down on the wrapping paper and traced it to cut out a piece to fit over the lid’s label. I glued that down. Not quite yet satisfied, I spied the pack of gift tags and cut apart one of the stars and glued it to the center of the lid. I outlined the star in glitter glue. Spying the ribbon, I decided to glue some ribbon around the carton to give it some “class”. Still not quite satisfied, I cut apart another star and glued it into the center, again outlining it in glitter glue.
And here’s my project:
No clue what I’m going to do with it at all, but it was a fun and cheap project!
[note to LJ feed readers: please click on the link at the top of this entry on LJ to leave comments, as I do not see comments left on LJ!]
2 comments
